Tank Blending

Summary
A simple way to blend two products into a single tank.
Description
Tank blending is a common practice, not just for merging two of the same kind of beer, but even two different brands. Tank blending in OBeer is incredibly easy and simple allowing you to merge two different brands into a single one or two of the same brand of beer together in a single tank.
Recent Changes
This functionality is new in OrchestratedBEER 3.5.
Details / How-To
CONTROL ITEM SETUP
The blend control item(s) are extremely important and are added when OBeer is installed. Their purpose is to overcome a challenge in SAP of have the same component item and finished good item on a production order. In layman's terms, you can't create an item out of itself and out of necessity the control item was created. In OBeer 3.5, the items OB9001 and OB9002 are created and assigned to all warehouses, and a Bill of Material is created for OB9001 that contains item OB9002, the rest of the setup is up to you.
The following additional setup is required:
- Set the item group for OB9001 & OB9002 by navigating to the item within Item Master Data, then selecting WIP: Green Beer or WIP Bright Beer.
Now, how is the control used? WARNING TECHNICAL STUFF COMING.. when you select Blend Tank.. the following happens
- A production order is created for the blend control item OB9001 that consumes the two beers. This accumulates the cost of these two items into whatever account you have set through the item group.
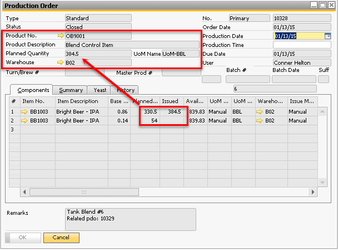
- This production order is then processed making planned quantity and issued quantity the same based on the value you said you received in the blend (usually 100% of both items)
- A 2nd production order is created for "Blended" bright beer (or green beer) that consumes the Blend Control Item, so that the value of those beers is captured in the final product and the batch ID is set.
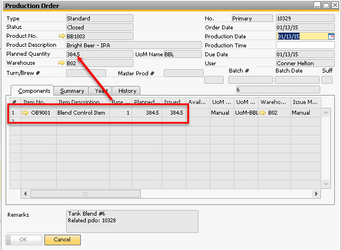
- The production order is processed with the planned quantity and issued quantity being equal.
- A blend history document is created so that we can see what happened.
Currently the blend control item passes the batch ID of the selected beer in tank, but not the MPN. This will be added in the future.
NOTE: Setup is required for this feature, navigate to the bottom of the page, or click here.
- To use this feature, navigate to Production → Cellar Worksheet or Packaging Worksheet, then locate the tank you wish to blend.
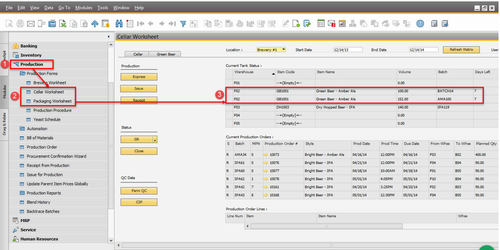
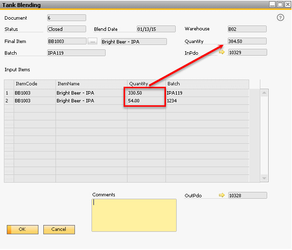
In this example the Cellar Worksheet is displayed and there are two beers with different batch IDs, effectively two items within the same tank, these beers are to be blended. - Right-click on the the tank you wish to blend and select "Blend Tank". The batch ID will default to the row you right-clicked on (but this can be changed).

- With the Tank Blending screen up, enter the Blend Date (will default to today), the final blended quantity (default to the sum in the tank), and verify the Final Item & Batch information. Clicking on the
 button will display the items in the tank and allow you to choose the final product. When you have finished click the
  button.
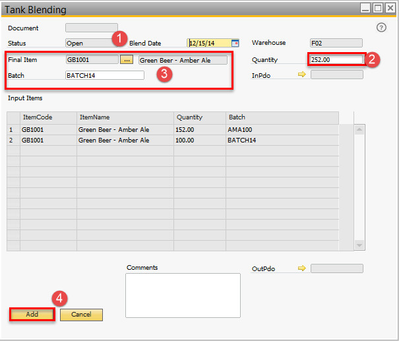
Additional Information
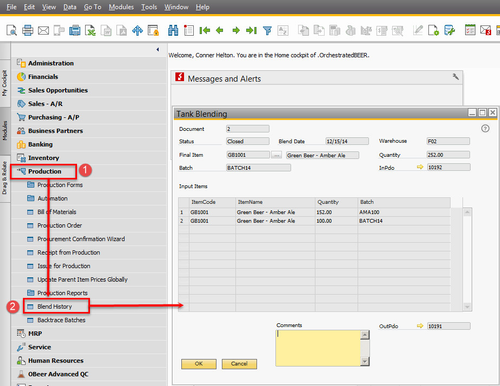
Blend History
- You can view the history of tank blends at anytime by navigating to Production → Blend History
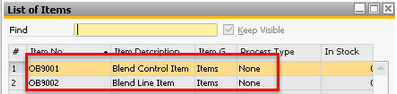
Control Items
- Tank blending uses two control items for the process to work. Both of these items require GL determination setup. The two items are OB9001: Blend Control Item and OB9002: Blend Line Item.
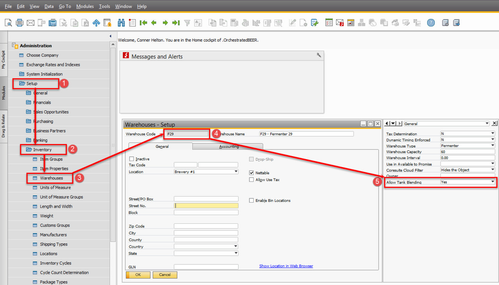
Warehouse Setup
- By default all warehouses are setup to allow tank blending. If you wish to change this flag, its done on the warehouse setup screen.
Navigate to Administration → Setup → Inventory → Warehouses. Then locate the warehouse you wish to change. Ensure User-Defined Fields are visible (Click View → Show User Defined Fields from the menu bar at the top). Then select NO from the Allow Tank Blending drop down.